When creating an event, having a ticketing system is one of the most required things you should have. With the Eventify theme, it is possible to create these bookable tickets with the integration of other plugins.
Required Plugins:
- Woocommerce Bookings
- WP Job Manager Products Plugin
Add Ticket as a Product:
- Products > Add New. Give a name to the product so it’s easily identified later. On the Add new page give details of the event in the description section.
- Product Data section: Details needed for the product to be like a ticket.
(i) Product Type – select “Bookable Product”. Check on Virtual and Has person checkboxes.
(ii) General Tab:
To set booking duration (event duration) admin can set fixed or custom blocks of time. For Example: If the product is a movie ticket then the fixed block will be equal to the duration of the movie (say 3hrs).
If the event ticket is for a conference with multiple guest speakers throughout the day event then the duration could be set to 1 day.

(iii) Availability tab:
To set no. of seats/show and other related details:
Max Bookings per block – total no. of seats available per show of the event. Min/Max bookable block – how early or how late an event can be booked.
Can also add buffer periods before and after each block/show.
Set the time when the 1st show starts
Admin can also block certain days from getting booked

(iii) Costs:
To set cost/booking
Here one can also set different cost for different hours/days/weeks/months
For Eg: Admin can set different prices for weekdays and weekends

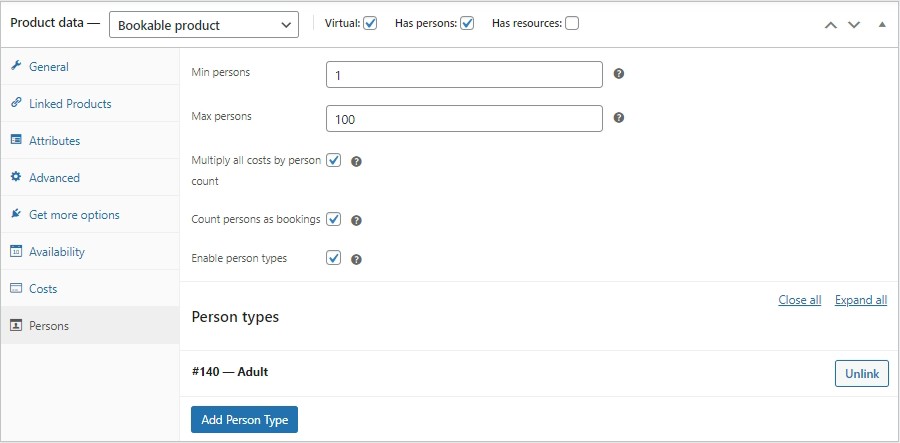
(iv) Persons:
Min and Max persons allowed/booking can be set.
Can also enable person type. For Eg: if the admin wants to charge differently for different age groups.
- Admin can also add details like images, short description etc. Once the settings are added, publish the changes.
Link Product to an event:
- Event > Add new
- Put all the details regarding the Event in this page.
- In “Select Your Services & Products” choose the product/ticket you’ve created for the event.

- Publish the changes.
Booking the ticket:
- It can be seen from the frontend that the product/ticket is now displayed under the event just created.

- On clicking the ticket the user can see images, description etc regarding the product.
The user also sees Price, Person Types & Calendar to select date.

- On selecting the date the user can see the time slots and no. of seats left. Select the preferred slot and click Book Now and proceed to payment.
