The “One-Click Demo Import” plugin simplifies the process of importing Jobify skin demos and quickly configuring your website to match your desired demo. It is essential to ensure that the Jobify theme is installed and activated on your WordPress site before proceeding. This step-by-step guide will walk you through the process using the standard procedure of the plugin.
Step 1: Install and Activate the “One-Click Import” Plugin
- Log in to your WordPress dashboard.
- In the left-hand menu, navigate to “Plugins” and click “Add New.”
- In the search bar, type “One-Click Import” and press “Enter.”
- Locate the “One-Click Import” plugin in the search results and click “Install Now.”
- After installation, click “Activate” to activate the plugin.

Step 2: Access the “One-Click Import” Settings
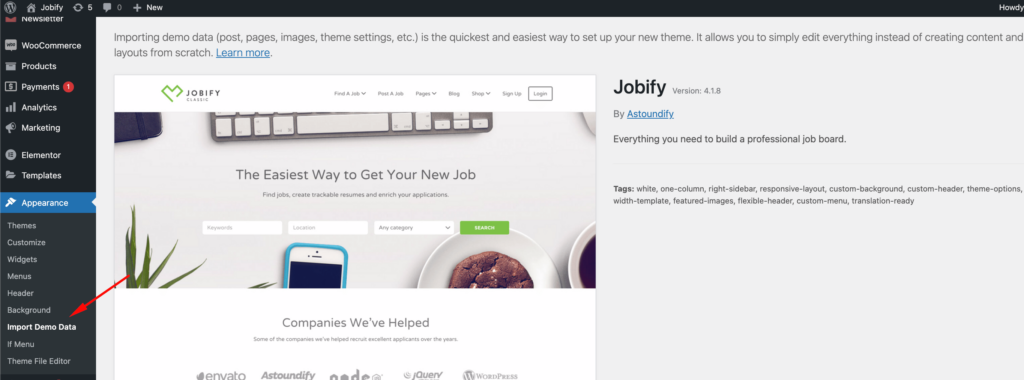
With the plugin activated, you will find a new menu item labeled “Import Demo Data” in your WordPress dashboard under the Appearance section. Click on it.

Step 3: Choose a Jobify Skin Demo
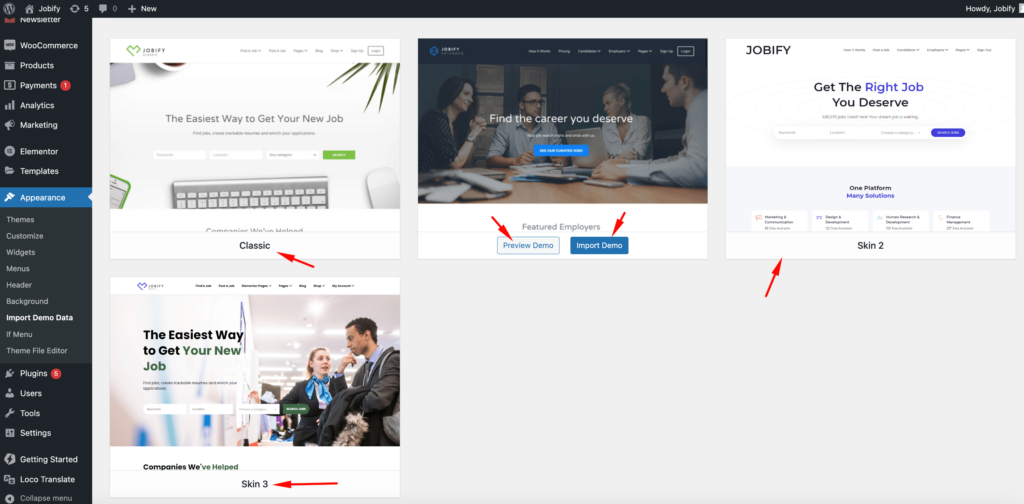
In the “Import Demo Data” section, you will encounter a list of available Jobify skin demos. Jobify may include multiple demos with distinct designs and layouts.
Preview through the demos and select the one that aligns with your desired website design. Click on your chosen demo to proceed.

Step 4: Import the Demo Data
After selecting the skin demo, you may be presented with some import options. These options might include installing recommended plugins.
Note: The plugins offered are recommended by the One-Click Demo Import plugin to enhance your website’s functionality. They are not mandatory for the Jobify theme to function. Please refer to this guide for a list of recommended plugins for the Jobify theme.
Once you are ready, click the “Import” button. The plugin will initiate the process of importing the selected demo data.
Kindly be patience, as the import process may take a few minutes depending on the demo’s skin size.

Step 5: Review Your Imported Demo
Once the import process is complete, you will receive a notification. You can now visit your website to review the changes.
Your site should now closely resemble the Jobify skin demo you selected. However, please be aware that some manual adjustments may still be required. These adjustments could include configuring menus, and widgets, and customizing specific elements to suit your content.

Step 6: Customize Your Site (If Needed)
Depending on your project’s requirements, you may want to further customize the imported demo.
Explore the WordPress Customizer and theme settings to make changes to colors, typography, layouts, and more. This will allow you to personalize the skin demo to your liking.
Step 7: Save Your Changes
Always remember to save your changes once you are satisfied with your customizations. The “One-Click Import” plugin has efficiently assisted you in importing the Jobify skin demo, and your website is now ready to use!
Congratulations! You’ve successfully utilized the “One-Click Import” plugin to import a Jobify skin demo, streamlining the setup process and making it more efficient. Enjoy working on your website and customizing it to your preferences.
