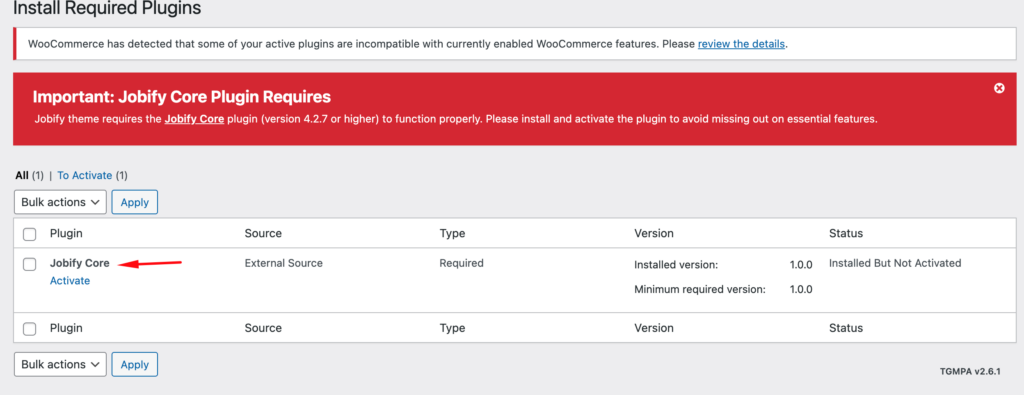
From the latest version of the Jobify theme (4.2.7 and above) requires the Jobify Core Plugin to function properly. If you have not installed the Jobify Core Plugin, you may encounter the following error message:
Important: Jobify Core Plugin Required Jobify theme requires the Jobify Core plugin (version 4.2.7 or higher) to function properly. Please install and activate the plugin to avoid missing out on essential features.

The Jobify Core Plugin is an essential component that allows you to connect with Astoundify.com to activate the theme and ensure proper functionality. This guide will walk you through the steps to install, activate, and configure the required plugins for an optimal setup.
Installing and Activating the Jobify Core Plugin
To ensure your Jobify theme functions correctly, follow these steps:
Step 1: Install the Jobify Core Plugin
- Navigate to your WordPress Dashboard.
- Go to Appearance > Install Plugins.
- In the lsit section, you should find the Jobify Core listed.
- Click Install Now.
- Once installed, click Activate.

Step 2: Ensure Other Required Plugins Are Installed
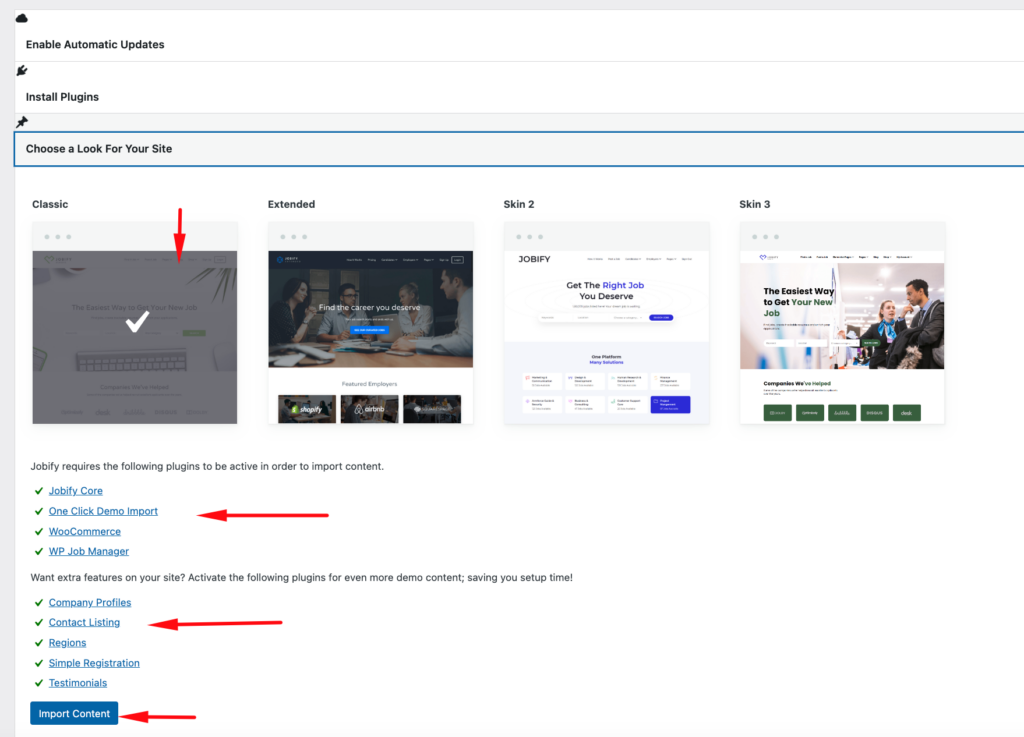
The Jobify theme also requires the following plugins for full functionality:
- Jobify Core Plugin (mandatory for activation and full functionality)
- One Click Demo Import (for importing demo content)
- WooCommerce (for eCommerce capabilities, if needed)
- WP Job Manager (for job listing functionality)
To install these:
- Navigate to Appearance > Install Plugins.
- Select the plugins listed above.
- Click Install and then Activate.
Connecting Jobify with Astoundify.com
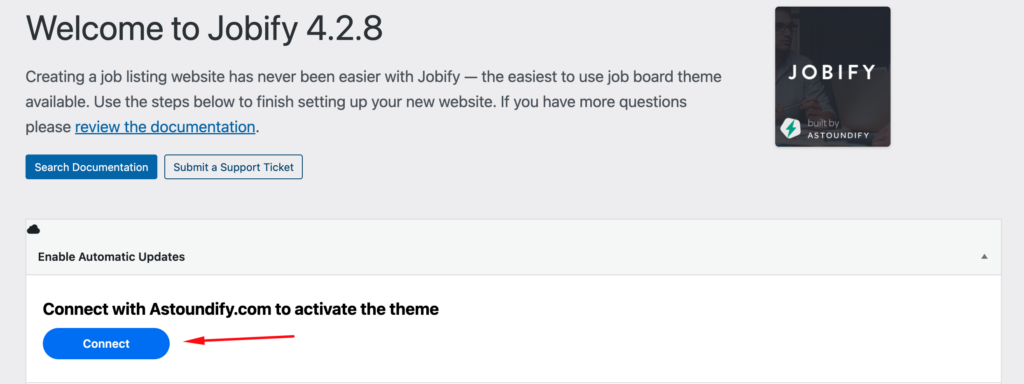
Once the Jobify Core Plugin is installed and activated, you need to connect it to Astoundify.com to validate your license.
Step 1: Connect Your Astoundify Account
- Go to Get Started in the left admin panel (located at the bottom).
- You will see a prompt: “Connect with Astoundify.com to activate the theme”
- Click the “Connect” button.
- You will be redirected to the Astoundify.com login page.

Step 2: Log in Using Envato or Astoundify Credentials
If you purchased Jobify from Envato, follow these steps:
- On the login page, click “Login with Envato”.
- Use the Envato account you purchased Jobify with.
- You will be redirected to an authorization page.
- Click Approve to allow Envato to connect with Astoundify.com.
- After approval, you will be redirected to Astoundify.com where your Jobify theme license will be displayed.
If you purchased Jobify 2.0 OnBoardyy or Addon Bundles directly from Astoundify, log in using your Astoundify credentials instead of Envato.
Finalizing the Setup
After connecting your Astoundify account, follow these steps:
- Return to your WordPress Dashboard.
- Navigate to Get Started in the admin panel.
- Install any missing required plugins.
- Proceed with the One Click Demo Import to set up sample content for your site.

Your Jobify theme is now fully installed, activated, and configured with the necessary plugins and licensing. You can now begin customizing your website and adding job listings.
Conclusion
The Jobify Core Plugin is a critical component of the Jobify theme (4.2.7 and above). By following the steps outlined in this guide, you ensure that your theme is properly installed, activated, and connected to Astoundify.com, unlocking all its features and functionalities. If you encounter any issues, visit the Astoundify support page to create a support ticket using your connected account.
Now that your theme is set up, you can start building your job board with confidence!
