Listify works with Polylang to create a fully multilingual website. This means you can have your website available in multiple languages. Getting set up with Polylang requires a very specific configuration which is outlined below.
Install Polylang
You can download Polylang here. Once installed visit “WordPress → Plugins” and activate Polylang. Then visit “Settings → Languages“.
1. Choose Your Languages
Before getting started you need to decide which languages you are going to offer. For this example, we are going to offer English and Spanish. You need to make sure you have the translation files for each of these languages available.
English does not require one, as this is the default language.
Visit /wp-content/themes/listify/languages and locate the remaining language files.

Once you have verified the language files for the languages you want exist, in ” Settings → Languages“. Add your languages. Choose the language from the list with the same country code as the previously located language files.The defaults should always be accurate.
2. Update Your Language Files
One caveat of Polylang is that it does not support multiple translation permalink structures. This means you cannot translate parts of the URL like /listings/ and /listing-category/ for each language.
Listify automatically generates these custom URLs based on the label of Listings set in ” Appearance → Customize“, and we need to stop this.
Open your chosen language’s .po language file in your translation program (for this example we are using Poedit). Find the following strings:
 These are the base slugs that are automatically transformed in to the URLs based on the label. We need to override this in each language to the base label of your default language (English).

This way the previous strings of %s will not be automatically replaced. Repeat this process for each language.
On top of the /listings/ slug we also need to update taxonomies. This includes categories, regions, and types.


Repeat this for the following strings:
- %s-type to listing-type
- %s-region to listing-region
Once you have done this for each language export your updated language files to generate your new .mo and .po files.
The key is having all languages use the same permalink slugs as the default language.
3. Upload Your Language Files
In order to avoid your language file updates from being overwritten we can move the files to your WordPress languages directory. First we need to rename them.
- es_ES.mo to listify-es_ES.mo
- es_ES.po to listify-es_ES.po
Now upload these files to /wp-content/languages/ and the next time you update Listify they will not be ovewritten.
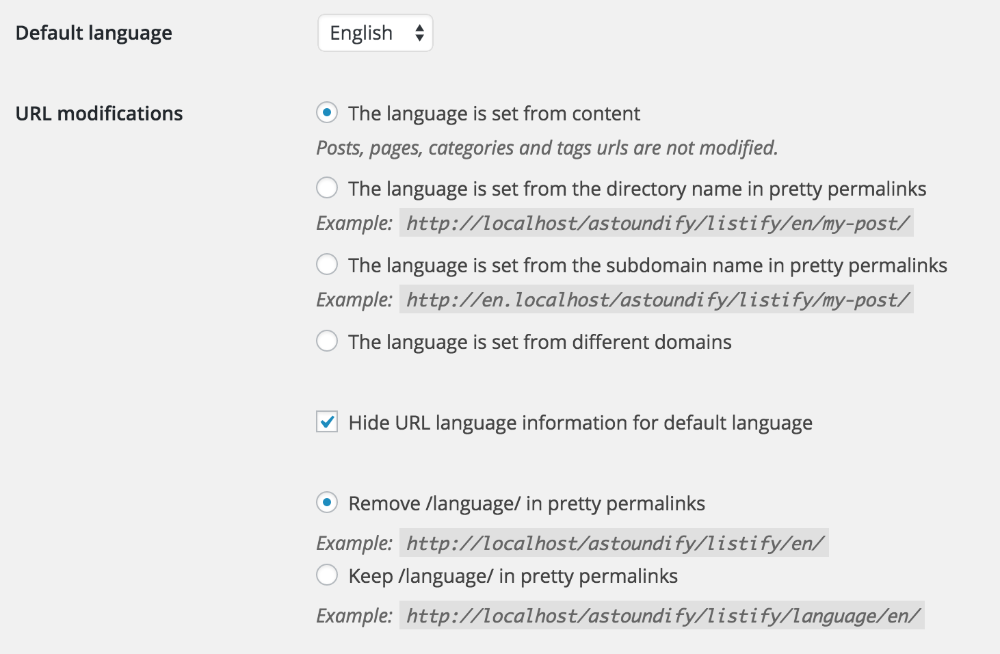
4. Configure Polylang
In ” Settings → Languages” click the “Settings” tab. Configure your settings as follows:
5. Translate Listify Strings
We still need to translate the actual Listing labels used by Listify (even though they are not used by permalinks anymore). Visit ” Appearance → Customize → Listings → Labels & Behavior“.
Modify the ” Singular Label” and “Plural Label” to a non-default value and click “Save and Publish“. This step is required for Polylang to register these as custom strings. You can change them back to the English default and click “Save and Publish” again.
Head back over to ” Settings → Languages” click the “String Translations” tab. You will now be able to translate the label for each language:

6. Translate Your Pages
The easiest first piece of content to translate is your Homepage. Visit ” Pages” and find your homepage. Click the “+” icon under your language.

Create your translated content and Publish. Repeat this for all existing pages.
7. Translate Your Taxonomies
With your default language selected, visit ” Listings → Listing Categories”
Much like the Pages, you will see a ” +” icon next to each of your existing categories for the default language. For each category, click the “+” to translate. Note: the screen will simply “refresh” and you will not be taken to a new screen. Enter your translated category title.
When adding the new category you will see the language you are adding it for, and the synchronized existing category.

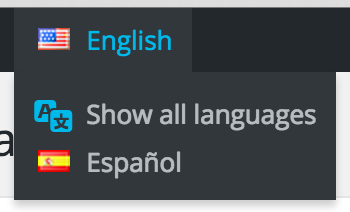
If you switch languages in the WordPress toolbar you should see the translated categories and the “Pencil” icon next to each indicating that they have an English counterpart.

Repeat this process for all categories, as well as any regions, types, or tags.
8. Translate Your Listings
If you are managing your listings as an admin you can translate your Listings just like a Page. Click the ” +” next to each existing Listing. Your existing custom fields will be transferred to the listing, and you will just need to translate the title, content, and select the corresponding taxonomies.
Unfortunately translating listings on the frontend is not possible at this time. When approving a listing an admin will need to click the ” +” icon for the languages that you want the user to be able to translate to. The content can either be copied 1:1 or a translation can be made immediately. These listings will then appear in the Listing Dashboard depending on the current language.
9. Translate Your Menus
Read about translating menus in the Polylang documentation.
10. Translate Your Widgets
Read about translating widgets in the Polylang documentation.
11. Save Your Permalinks
When in doubt, visit ” Settings → Permalinks” and click save.