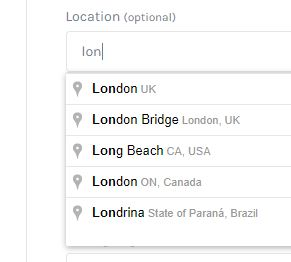
The Auto Location plugin is a powerful tool that allows you to provide users with an auto-suggestion dropdown of locations as they start typing in an input field. By utilizing custom HTML classes or CSS classes, you can specify which input fields should display this location dropdown feature as shown below:
In this guide, we will walk you through the process of using custom classes to enable the location dropdown on specific input fields.
Before Getting started, please note that this process requires that you have a Google Maps API KEY which is required by the auto location plugin in order for the Google Maps to fetch location suggestions.
Please note that the steps mentioned in this guide may vary slightly depending on the specific implementation of the Auto Location plugin you are using. However, the general concept of using custom classes to target specific input fields remains the same.
Step 1: Install and Activate the Auto Location Plugin
Before we begin, make sure you have already installed and activated the Auto Location plugin on your website. If you haven’t done so yet, please follow the plugin’s installation instructions to set it up.
Step 2: Identify the Input Field for the Location Dropdown
Determine the input field on your website where you want to display the auto-suggestion dropdown for locations. It could be a text input field or a search bar where users can enter their desired location.
Step 3: Get the HTML/CSS Class of the Input Field
To specify that the location dropdown should be displayed for a particular input field, you need to identify and obtain the HTML/CSS class of that input field. This class will serve as the unique identifier for the plugin to target.
There are a couple of methods you can use to retrieve the HTML/CSS class of the input field:
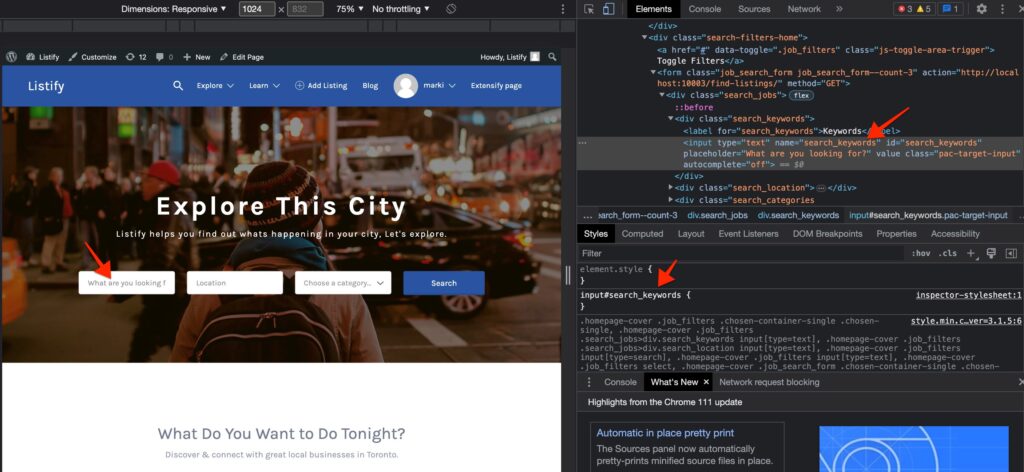
Method 1: Using Browser Inspector Tool
- Open the web page where the input field is located in your web browser.
- Right-click on the input field and select “Inspect” or “Inspect Element” from the context menu. This will open the browser’s developer tools.
- In the developer tools panel, the HTML code for the selected element should be highlighted.
- Locate the input field within the HTML code and look for the
classattribute. The attribute value will contain one or more CSS classes separated by spaces.
For example:<input type="text" class="search_keywords">In this case, the HTML class for the input field is “search_keywords”.
Method 2: Requesting Assistance from the Developer
If you are unable to locate the HTML/CSS class using the browser inspector tool or if the input field is generated dynamically by your theme or a plugin, you can consult the documentation or seek assistance from us as developers of the theme via our support link here.
Once you have obtained the HTML/CSS class for the input field, proceed to Step 4 to configure the plugin settings.
Step 4: Add the Classes to the Plugin Settings
Once you have obtained the custom class for the input field, it’s time to add it to the plugin settings to enable the location dropdown for that specific input field.
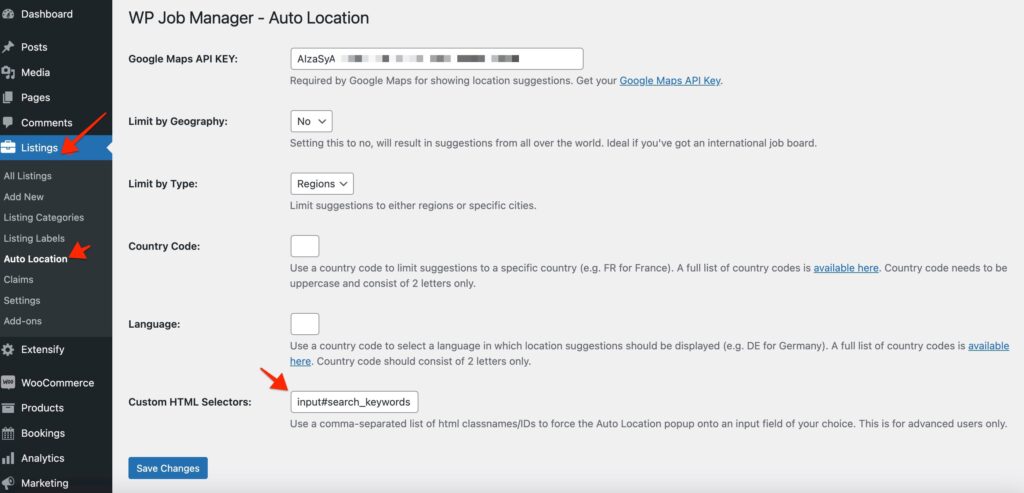
- Navigate to the WP-Admin > then to the Listings tab.
- Within the Listing tab select the Auto Location plugin setting.
- On this page, look for the section labeled as “Custom HTML Selectors“
- Enter the custom HTML class or CSS class you assigned to the input field in the previous step. In our example, it would be “
search_keywords
Save the settings to apply the changes.
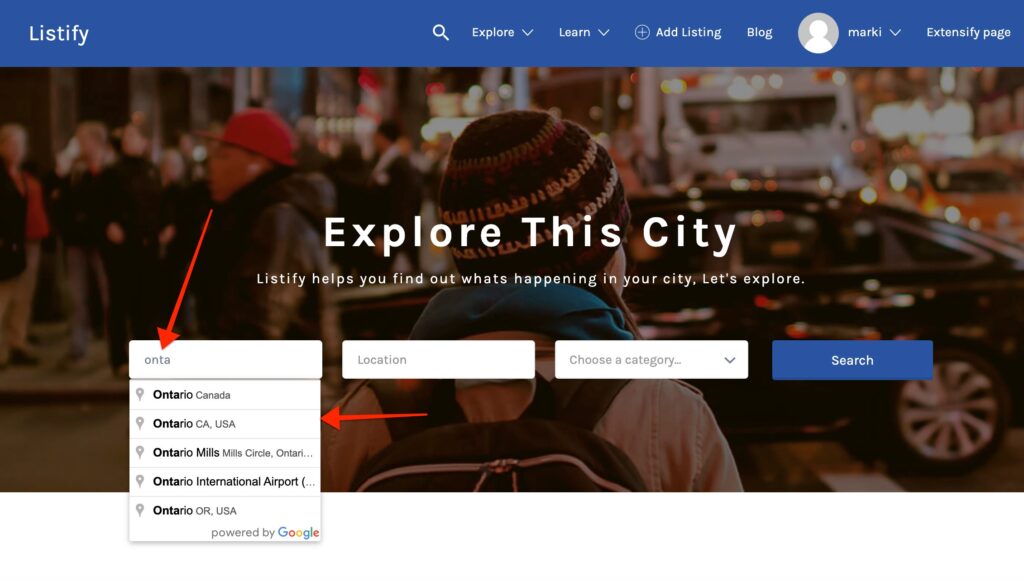
Step 5: Test the Location Dropdown
With the custom HTML class or CSS class added to the input field and the plugin settings configured accordingly, you are now ready to test the location dropdown functionality.
Visit the page or form where you have implemented the input field. Start typing in the input field, and you should see the auto-suggestion dropdown displaying relevant location suggestions as you type.
Congratulations! You have successfully used custom HTML classes or CSS classes to enable the Auto Location plugin’s location dropdown on a specific input field. Repeat these steps for any additional input fields where you want to provide location suggestions to your users.